This step-by-step paper mache volcano tutorial has everything you need to build a strong, lightweight volcano that really lasts. With clear instructions, helpful photographs and practical tips throughout, you’ll be able to create an impressive volcano model from simple materials like newspaper and cardboard.

Whether you’re making it for a school project or just fancy building something spectacular from a pile of “junk”, this is a fantastic hands-on activity for kids. Most of the structure is simply scrunched newspaper and paste, so it’s surprisingly straightforward to make — and sturdy enough to survive the trip into the classroom.
In this guide you’ll find shaping techniques, drying advice, painting ideas for realistic lava effects and optional instructions for turning your volcano into an erupting science experiment if you need that extra wow factor.
It’s a fantastic educational activity to do together at home — messy, creative and genuinely satisfying from start to finish.
More Paper Mache Crafts You Will Love
Other papier mache crafts you may like; Papier Mache Elf Shoes, Papier Mache Shelves and Paper Mache Mermaid Collage.


This post contains some affiliate links for your convenience (which means if you make a purchase after clicking a link I will earn a small commission but it won’t cost you a penny more)! As an Amazon Associate, I earn from qualifying purchase
Materials Needed To Make Paper Mache Volcano
- A large piece of cardboard (flattened cardboard box),
- Scissors,
- Newspaper,
- Large plastic bottle (optional),
- Paper Mache paste or Cellulose adhesive (watered-down white glue can also be used),
- Large bowl,
- Paint (standard and glitter paint),
- Loose glitter (optional)

Click here for my DIY Paper Mache Paste Tutorial using flour and water or watch my video tutorial below that explains how to make it.
How To Make A Paper Mache Volcano Base
First, make up a large quantity of adhesive paste.
We used cellulose adhesive which has a similar consistency to wallpaper paste but contains no fungicide and is safe for children to use. It’s relatively cheap, easy to mix up (just add water) and the kids love it.
You can also use watered-down PVA glue or make your own flour and water paste. About 50% glue to 50% water, works if you’re using a strong white glue.

If you’re going to make a ‘live volcano cut the top of an old plastic bottle (with the lid on). Keep the top section with the lid to use as a bowl for the lava if you’re going to make a lava mix when you’ve finished. Details on how to make erupting lava are towards the bottom of the post.

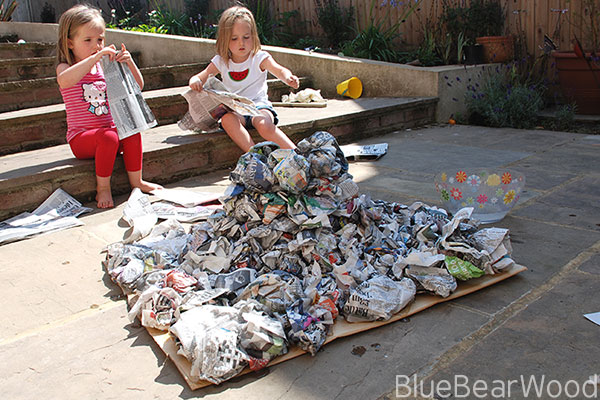
Put the bottle in the middle of your large cardboard base. Scrunch up the newspaper, dip it in the adhesive paste and build up your volcano shape around the bottle.

Once you’ve built the main volcano shape cover the rest of the cardboard base.
How To Make The Paper Mache Volcano Walls
Tear the remaining newspaper into strips and use the remaining adhesive paste to stick the strips over the volcano to make a smooth surface. You will need to cover with at least 2 to three layers of newspaper.

The finished volcano should end up looking similar to this. You will need to leave the volcano to dry for a few days. Try and leave raised off the ground so the underneath and main bulk of the volcano can dry properly. Do not leave the volcano on furniture as the underneath gets very wet and will cause damage. We covered a table with plastic sheeting and raised it using some large lego pieces.

How To Paint Your Paper Mache Volcano
Mix up some paint and paint your volcano. We made a purple-brown colour and added gold glitter so that our volcano had minerals. You’ll need to do a couple of layers allowing the paint to dry between each one.


When the base paint has dried squeeze paint out of the paint bottles to create lava runs around the top of the volcano. The girls had great fun watching the paint dribble down the volcano. We added a few trails of glitter paint at the end.

How to Make Your Paper Mache Volcano Erupt (Optional)
If you’d like to turn your paper mache volcano into a proper science experiment, you can create a classic baking soda eruption. This works brilliantly for school projects and is always a crowd-pleaser.
You Will Need
- Bicarbonate of Soda (UK) / Baking Soda (US)
- Warm water
- Washing-up liquid
- Red or orange food colouring
- Vinegar
- Bowl-like a container that fits in the top of your volcano (optional)
- Paint sealant (varnish, pva glue varnish, cling film to protect volcanopaint )
The Best Eruption Ratio
For a strong, foamy reaction, I use:
1 part bicarbonate : 1 part warm water : 4 parts vinegar
You can adjust this slightly if you’d like a smaller or larger eruption. It’s worth experimenting beforehand to work out what’s best for you.
1: Make the Lava Mixture
In a small bowl, mix:
- 1 part bicarbonate of soda
- 1 part warm water
The bicarbonate won’t completely dissolve — that’s fine. You’re making a slurry so the vinegar can react evenly. If you use dry bicarbonate on its own, the reaction can be clumpy and less impressive.
Now add:
- A squeeze of washing-up liquid (this creates thick, foamy lava)
- A few drops of food colouring
If you’d like streaks of colour, don’t mix the colouring in fully.
2: Position Your Eruption Bowl
You’ll need a shallow container at the top of your volcano that dips slightly into the bottle opening.
You can:
- Use the top section of the plastic bottle you cut earlier (leave the lid on),
- Find a plastic insert that fits in your trash
- Shape a small bowl from kitchen foil (use at least 2 layers)
Place the bowl securely before adding vinegar.
3: Create the Eruption
Pour in 4 parts vinegar, then stand back and watch the lava flow down the sides of your volcano.
The washing-up liquid helps create thicker bubbles, making the eruption last longer.
Important: Will This Damage the Volcano?
Because this involves liquid, repeated eruptions can your volcano over time.
If you plan to erupt it more than once, you could:
- Treat it as a one-time experiment for your school project
- Seal the top of the inside and the external surface of the volcano
- Add a removable plastic insert
- Cover the outside with clingfil when you have an eruption
Ideas For Using Your DIY Paper Mache Volcano
Our paper mache volcano was still going strong 10 years later. We added some animals and bits of rock for imaginary play to start with but the girls used it in loads of different scenarios and at one point we even had a plant growing out of it.
It was taken into school for topic work a few times by all three of my girls.

Eventually, we turned it into an electrical Joules Island for a massive school project. Adding crops around the base, a waterfall for water-generated energy, wind turbines etc.
oooh that is fab! and I agree WAY too pretty to spoil 🙂
Thanks so much for linking to Science Sparks. xx
oooh that is fab! and I agree WAY too pretty to spoil 🙂
Thanks so much for linking to Science Sparks. xx
So fun!! It came out beautifully! Thank you for sharing at Sharing Saturday! I hope you are having a wonderful week!
So fun!! It came out beautifully! Thank you for sharing at Sharing Saturday! I hope you are having a wonderful week!
Just want to let you know that I will be featuring this week at Sharing Saturday! Feel free to stop by Crafty Moms Share and grab a featured button if you would like. I hope you have a wonderful weekend!
Just want to let you know that I will be featuring this week at Sharing Saturday! Feel free to stop by Crafty Moms Share and grab a featured button if you would like. I hope you have a wonderful weekend!
This is so much fun!
This is so much fun!
Brilliant I want to make one for our dinosaur play
Brilliant I want to make one for our dinosaur play
Super cool now to make it for our grade 7 project
Super cool now to make it for our grade 7 project
From one mom ti another…I must say that I was drawn to your post when looking for ideas for our 9 year old sons request to make a volcano for his visual to accompany his paper and ……..THANK YOU, THANK YOU THANK YOU!!! We followed your step by step an it turned out FANTASTICAL!!!!!! His presentation is Wednesday and he is excited to share it with the school!!!
Aw, that’s wonderful. I hope his presentation went well and that you made some fabulous memories while making it 🙂
This is the best tutorial I have found. I am making a volcano for my sons 5th birthday as a table centerpiece with dry ice and wanted it realistic. This hits the nail on the head. ♡♡♡
Is this water proof enough to do the vinegar baking soda thing inside?
Yes (and no). The plastic bottle makes the inside water proof. You might want to add a little varnish to the paper mâché paste at the top of the volcano where it all spills out. Because the paints are waterbed you will get paint run and removal if using the baking soda thing. That’s one of the reasons we decided not to do that with this volcano (it was the original plan) but we loved how it looked so much we decided to keep it as a toy background and it’s still being used now. IT’s easy to cover up and wet marks after wards but sometimes the marks left by the soda look good themselves. You could varnish the whole volcano to protect it or f it’s not going to get soaked use a watered down PVA glue varnish. Or leave it and see what happens… a bit like a real volcano. Will it explode and get damaged or will it just change colour.
Just found your website and looking forward to making one for now and replicate it if it works out following your instructions. Varnish tip was a good thing to include info because I want to use vinegar and bicarbonate Sosa for a real science lesson. Thanks x (from Australia)